The basic problem I wanted to solve was how to get the exterior lights on in a building I walked to at night, so I did not have to walk there in the dark. By placing a Pi in this building, connected to a LAN, and having that Pi control relays that could by pass the current 120V switches using a relay, I could turn the lights on or off remotely through commands to that Pi. This project grew over the next couple of years to add lights on the house as well as local low voltage switches off the pi's so you could turn the lights on or off with the flick of a switch from either end. The last extension was using a cron job to set the lights on a timer as well. One of the benefits of this design is many inputs can turn the lights off or on, and they can do it in any order, with no conflicts.
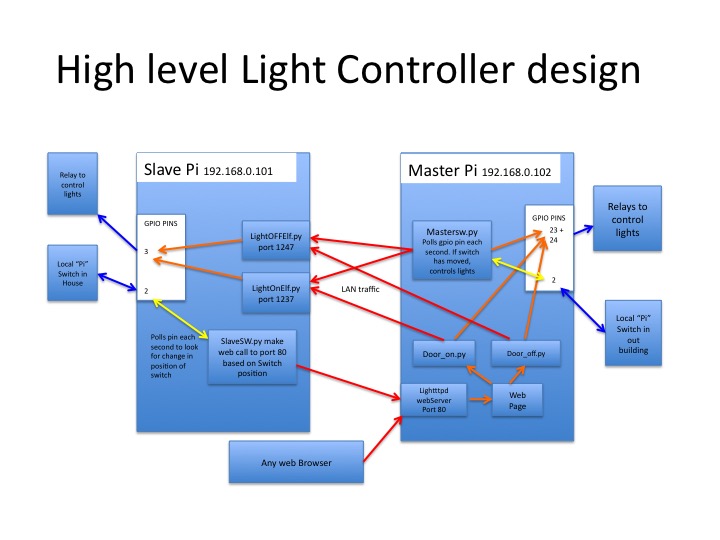
This project requires creating a webserver on the Pi as well as a web page that will call Python scripts to raise or lower GPIO pins to fire off the relays. I used relays to simulate the closing of the 120V switches by adding wiring to tie each side of the switch to the relay. It also has simple socket programming to coordinate between the two Pi's controlling the relays in each building. The project also uses GPIO pins as inputs to tell when a local, low voltage, switch connected to the Pi has been thrown to also turn the lights on or off. This was as many ways as I could think of to control the lights, and it provides some fun and simple programs that leverage a number of concepts. You can review the block diagram of the design here.
The Mechanical side
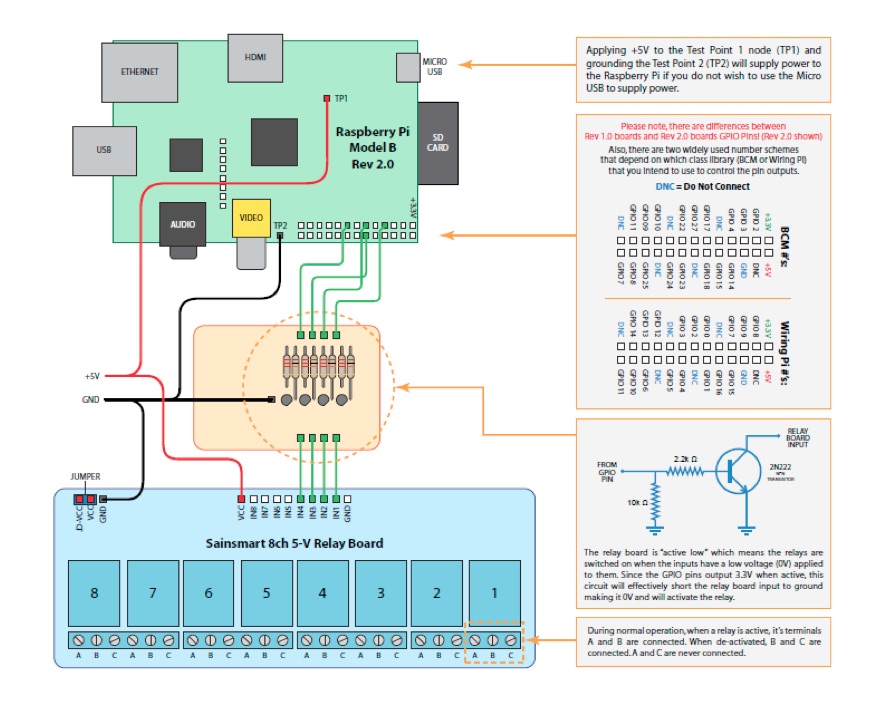
I am using a relay to connect the two poles of a light switch. When the relay is closed, the light switch is on no matter what happens with the switch. If the relay is open, the switch acts normally. Here is an image of the Pi controlling the out buildings lights. This is the "master Pi" in the design and is also hosting the webServer. The local switch was added after things were mounted and hence the "add on" feel to the local switch. Since it is low voltage, low current, I used phone wire and a regular house switch mounted in a box for the Pi switch in the house. This makes it easy for the switch to be a reasonable distance from the Pi.
The relay is controlled by a Pi at each location using GPIO pins. The output of the GPIO pins are used to control a simple transistor circuit that fires the relay. The diagram shows the wiring of a 8 channel relay. I used a two channel model in my project, but the basic idea is the same. I purchased the relay from Amazon.com
In addition, at each Pi, there is a simple switch that the Pi tracks through polling (once a second) a GPIO input. If the switch has moved since the last check, the Python program
will open or close the relays on each side as needed.
The software side
The software breaks into a number of components since the goal was to control the lights with so many possible inputs. It could be simplified if the number of remote ways to trigger the lights was reduced. At the highest level, this design makes one of the pi's the master, in that commands for the lights are generally sent to it and it sends requests back to the second Pi (the slave Pi). Since I started with a web based interface, to make it easy for any device that could call up a web page control the lights, when items like local switches or python apps were added, they also leverage the web interface. This was done to reduce the variety of code paths. With this in mind, we ended up with the following pieces of code:
The Web server
This link provides the details on setting up the web server. By assigning the Webserver Pi a fixed IP address, it is easy to access the web site on the local router network. We have not tried to control the lights from remote networks as this would require opening up the firewall, and for this project, we only need to control them when we are local.
The Main Web Page
This link provides the basic home page to control the lights. The webserver is very capable, and can be used for any hosting project and to learn a good deal about web page design. This link shows how the simple web page defined above looks in a browser. Using a webpage as one of the main interfaces allows any visiting computer with a browser to have the enjoyment of turing the lights on or off. No apps to install. You will be able to bore your friends quickly, without compromising their phones or laptops! I simplified the webpage example down to the very basics to just show the control of the lights to avoid confusion.
Python programs to control the relays and send a socket call to the slave Pi
This link details the Python code to fire and GPIO's and wire the relay circuits. We have a Pi controlling a relay on each set of lights. To keep the code paths consistent, no matter which action (local switch, web interface, cron file, etc) is taken to turn the lights on or off, it is sent to the "master Pi" who turns off the local lights and then sends a socket call to the slave Pi to turn off the other relays.
The Python code to poll the local switch
This link details the design of the local switch on each Pi and how we detect on or off changes.
It is sometimes nice to be able to just flip a switch to get the lights to fire. No need to dig your phone out of your pocket, or open a browser. We put such a switch near each Pi. Since the switches are very low power (3.3v) and very low current, you can use two wire phone cable is the wiring from the switch to the Pi if you want a little more remote operation. By using GPIO pins to detect when a mechanical switch has been opened or closed, we can simulate a light switch controlling both set of lights.